Everything you need to know about Helm as a Beginner
Package Manager for Kubernetes


📌 Prerequisite
Before we begin to understand what Helm is all about, I would recommend you to have basic understanding of what is Kubernetes. If you don't have any idea about Kubernetes, you can go ahead and take a look at my last blog where I have explained about it in detail and if you don't want read through all that then I also have a video on the same on my YouTube channel so do give that a watch!
⚙️ So why do we need Helm?
Well we all know how awesome Kubernetes is right? But let’s say we have to set up a WordPress site, then the deployment involves orchestrating various components, such as MySQL web servers, a persistent volume (PV) for database storage, PersistentVolumeClaim (PVC), a Service to expose the web server to the internet, and a Secret to store admin credentials, among other things like periodic backups and jobs.
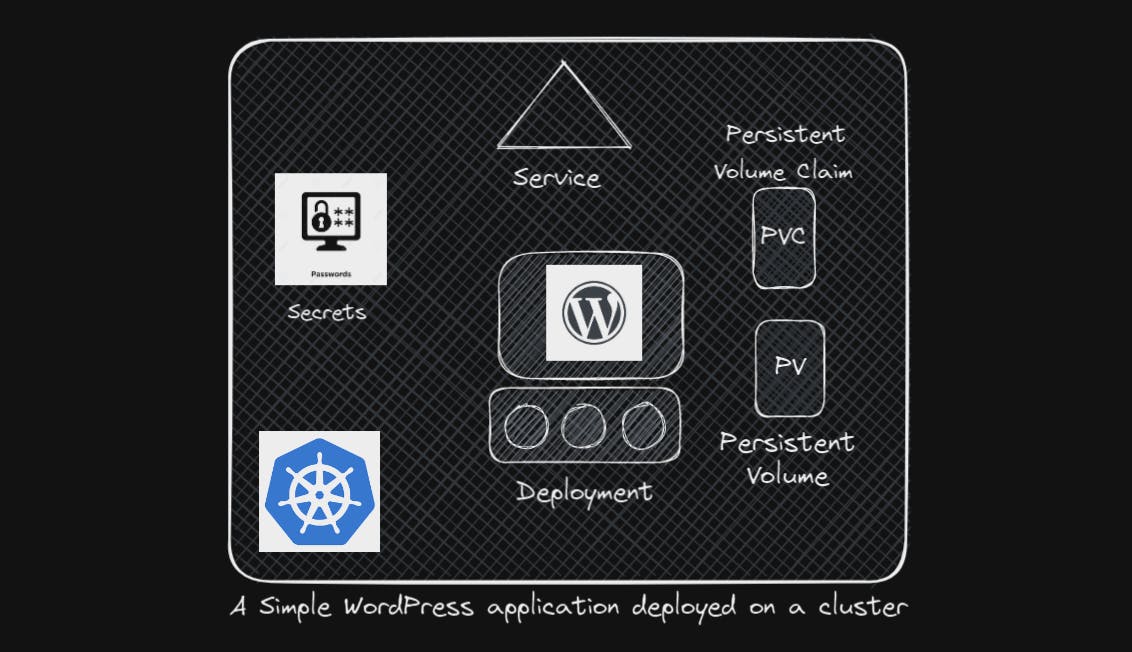
P.S: I took the above image used in this blog from another blog post as it was so well created so props to the original creator for this.
Each of these components requires a dedicated YAML file, and employing kubectl apply to create these objects can be a laborious process. Fast forward a few months, and if there's a need to upgrade components, meticulous editing of multiple YAML files becomes imperative. Similarly, uninstalling the application involves recalling and deleting each associated object individually—an undeniably tedious task.
What to do now??
⚙️ Here comes HELM!!
Helm makes the life so much easier for us. Well you might ask HOW? See Kubernetes doesn't care about our application as a whole as even though we have created different objects for different components of our WordPress application, it considers them as a separate entity whole together.
The amazing thing is Helm is built from the ground up to know about such stuff. That's why it's sometimes called Package Manager for Kubernetes. It looks at those objects as a part of a big package as a group. Whenever we want to perform an action, we don't tell Helm the objects it should look after rather we tell Helm it belongs to the WordPress package, and then on the package name, it then knows what object it should edit even if 100s of objects belong to that package!
So we don't have to go around creating YAML files for every separate component of our application instead all we can do is this 👇🏼
$ helm install wordpress
Using Helm, we install our whole application using a single command even if it needs hundreds of objects. Helm proceeds to automatically add every necessary object to Kubernetes without bothering us about the details.
Obviously we can make changes to the default values but the thing is instead of making changes to hundreds of files we now have a everything at a single location making our job easier.
⚙️ Helm 2 vs Helm 3
📌 Tiller and Helm 2
Helm has a CLI client installed on your local machine that helps to perform Helm-specific actions against your Kubernetes cluster. When Helm 2 was launched, Kubernetes lacked features like RBAC(Role Based Access Control) and Custom Resource Definitions. To allow Helm to perform its actions, an extra component Tiller was installed in the K8s cluster. So, Whenever a user wanted to perform some Helm-specific action, It communicated with the tiller that was running on some server which in turn communicated with the K8s cluster and proceeded to take the action requested by the user. So, Tiller being the middleman added complexities to the cluster and gives rise to security concerns. By default, Tiller had the privilege to do whatever it wanted. This is good as it allows us to make all necessary changes in a K8s cluster to install charts. But this was also bad since anybody with Tiller access can do whatever they want.
📌 How security concerns were resolved with Helm 3?
After the introduction of Role Based Access Control (RBAC) and Custom Resource Definitions in Kubernetes, The need for Tiller decreased, so It was removed entirely in Helm 3. Now, nothing was sitting between the Cluster and Helm CLI, and security improved with RBAC as users can be limited with what they do with Helm. Before RBAC, we had to set these limits in Tiller which was not the best option but with RBAC built from the ground up to fine-tune permissions in K8s, it is pretty straightforward to do. As far as K8s is concerned, It doesn't matter if you are trying to make changes by accessing the cluster with kubectl or with helm commands, The user requesting the changes has the same RBAC allowed permissions whatever tool they use.
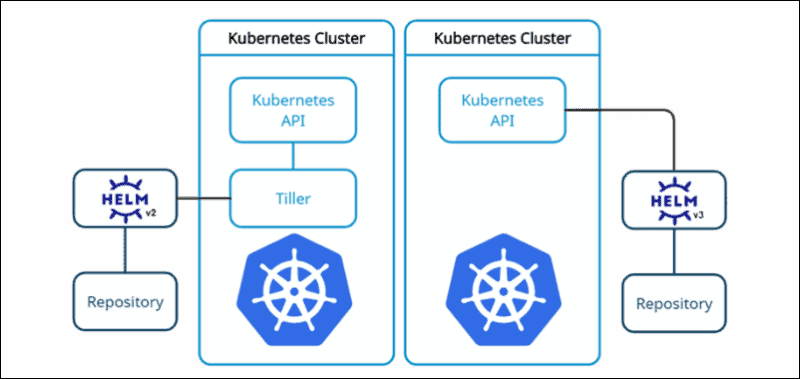
That's a big difference between Helm 2 and 3 where Helm 2 uses Tiller while Helm 3 simplifies it by removing Tiller & integrating it with Kubernetes.
⚙️ Installing and Configuring Helm!
Before installing helm, we must have a functional Kubernetes cluster and kubectl installed and configured on your local computer with the right login details set up in the kubeconfig file to work with the intended Kubernetes cluster.
Helm can be installed on Linux, Windows, or Mac OS systems. We will go over the instructions for installing Helm on Linux systems in this blog.
- Systems with snap can install helm using the snap install helm command. Use the classic option to install a more relaxed sandbox that gives the app a bit more access to the host system rather than strictly isolating it to its separate environment. This way Helm can easily access the kubeconfig file in your home directory so it knows how to connect to your Kubernetes cluster.
$ sudo snap install helm --classic
- For APT-based systems such as Debian or Ubuntu, Follow the instructions to add the key and sources list before installing Helm.
$ curl https://baltocdn.com/helm/signing.asc | gpg --dearmor | sudo tee /usr/share/keyrings/helm.gpg > /dev/null

$ sudo apt-get install apt-transport-https --yes

$ echo "deb [arch=$(dpkg --print-architecture) signed-by=/usr/share/keyrings/helm.gpg] https://baltocdn.com/helm/stable/debian/ all main" | sudo tee /etc/apt/sources.list.d/helm-stable-debian.list

$ sudo apt-get update
$ sudo apt-get install helm
- And for PKG, run the package install helm command.
$ pkg install helm
- For installing Helm on Windows and Mac OS Refer to the Official Helm documentation
📌 Conclusion
In conclusion, Helm proves to be an invaluable tool for streamlining and simplifying the deployment of applications in Kubernetes for beginners. Its user-friendly charts, easy-to-understand templates, and seamless package management make it an excellent choice for those just starting their journey with container orchestration. As you continue to explore Helm, remember that its vibrant community and extensive documentation are there to support you on your path to mastering application deployment in Kubernetes. Happy Helm charting!
Well that's all for now but we'll meet again soon in our next blog.
Till then you can follow me on LinkedIn and Twitter.